
RECIPE: Cooking Hot Dogs
Hot dogs are a campfire classic. Perhaps one of the most iconic examples of camping food. And for good reason too. Since they’re technically precooked, hot dogs are by far the lowest stake meat to cook over a fire. They’re cheap, widely available, and there’s zero chance you might accidentally undercook them.
But while hot dogs are an extremely versatile camping food, we’ve had our fair share of dried out, burst skinned, heavily carbonized dogs to know it is still very possible to screw them up. Just tossing them on the grill will work most of the time, but if you really want do hot dogs right – then we have some suggestions.
Tips and Tricks for Making Campfire Hot Dogs
Clean the grill grate or use cast iron: We’ve been to enough campsites to know 9 out of 10 campfire grill grates are practically unusable. Years of exposure has left most of them crusty and rusty. Moral of the story, don’t count on them. If your campfire has a clean grill, great! If not you can try to give it a clean with some steel wool. But if it’s beyond repair, you can either bring your own grill grate from home and lay it on top. Or you can just use a cast iron skillet to sear your hot dogs. ProTip: If you use a cast iron skillet, we highly recommend using butter while searing!
The Two Zone Heat Setup: The best way to cook hot dogs over a campfire is a two zone heat setup. That means one half of your grill is hot and the other is warm. Since most campfires have fixed grills, you’ll have to build or reposition your fire in a way to achieve this effect.
As with virtually all types of campfire cooking, you want to be cooking over embers, not flames. Cooking over an open flame will result in burnt, burst skin, soot-covered dogs. So get your fire started at least an hour ahead of time and let it burn down to a nice bed of embers. Or, if you’re short on time, pack along a bag of charcoal.
The two zone heat setup will allow you a lot of versatility to both cook and keep things warm. Which leads us to our preferred hot dog cooking technique…
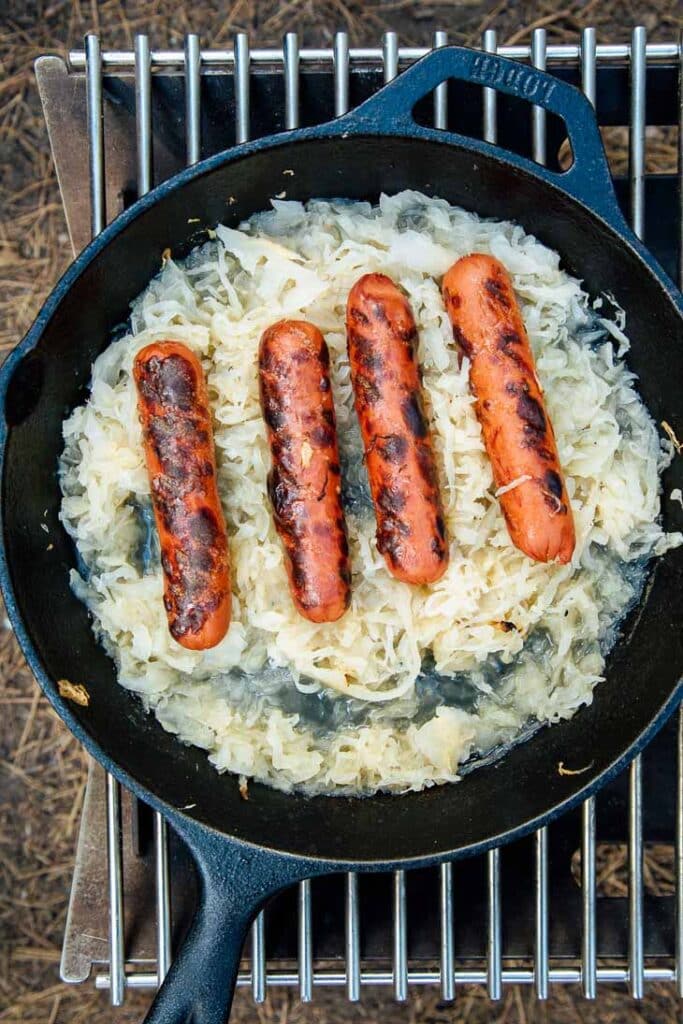
Poach, Then Grill: Taking a page from Kenji Lopez-Alt’s book from Serious Eats, we’re big fans of the poach first, grill second approach. This is more critical for sausages, but it has a lot of benefits for hot dogs too.
The idea is you get a container (disposable aluminum baking pan or high sided cast iron skillet) and poach the hot dogs in a liquid base. We’re fans of dumping in a jar of sauerkraut, a can of beer, and adding in some mustard. Place this over the hot section of your grill and bring it to a light simmer. This will bring the hot dogs up to temperature, keep them plump and juicy, and infuse them with some additional flavor.
When you’re ready to grill, move your container to the warm section of the grill and then pull out your hot dogs and place them on the hot side of the grill. You just want to get a nice even char the outside without breaking the skin casing. Once the dogs are done, you can either serve them immediately or return them to the container to keep them warm (this is a great tip if you’re cooking a lot of hot dogs for a group!).
Some Favorite Gourmet Hot Dog Combinations
The Classic: Sauerkraut + Mustard + Relish
Buffalo Style: Wing sauce mixed with mayo + blue cheese crumbles or bleu cheese dressing + sliced green onions
Nacho Dogs: Jalapenos + pickled red onions + cheddar cheese + salsa + jalapeno chips + cilantro
Chili Dog: Chili + cheddar cheese + diced white onions + sliced green onions
Reuben Dog: Sauerkraut + Swiss cheese + Thousand Island Dressing + dill pickle chips
Elote Dog: Grilled corn + mayo + cotija cheese + cilantro + lime + chile
Hawaiian Dog: Grilled pineapple + teriyaki sauce mixed with mayo + grilled red onions + Hawaiian roll + tropical salsa chips